Tuesday 2 April 2024

How to add "Discord" in Steam's Big Picture Mode

 With the release of Steam deck a lot of people are turning into Steam Deck Big Picture Mode(BPM) to enjoy an exclusive gaming experience, to get your PC to behave like a console. However, BPM isn't as robust as steamOS and requires a lot of tinkering to make things work. Discord is a big part of social gaming experience so I am writing a guide to get it working in BPM.


Disclaimer: despite this guide, a discord upgrade might break the link and you may have to remove the app from steam and redo it.
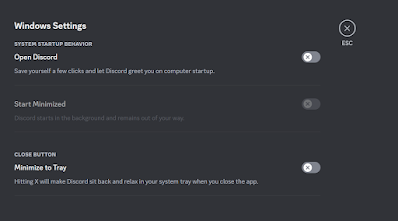

Disable Automatic startup of Discord and set your settings as follows:


Disable Hardware acceleration, this doesn't work very well in BPM


Close Discord, insure its not running in the background


Open Steam in regular mode, click on Games > Add a Non-Steam Game > Browse > Type (%localappdata%\Discord) in the path as show:


Navigate to the latest "app" build, you can sort it by date modified:


Select "Discord" and add, once you're back to the Steam window, you should see two discord options, select the one selected below:


Click on Settings on the newly added "Discord" app and make sure Steam input is enabled:


Launch BPM with your controller connect, Navigate to discord, before launching insure that Keyboard input (WASD) is set, you may also want to reduce Mouse sensitivity:


Go ahead and Launch discord, you should be able to use controller as a Mouse. If you "minimize" it and then press the "Steam" button on your controller, you can open the main steam menu on BPM and launch whichver game you want to play while discrod runs nicely in the background. If you want to close discord you can navigate back to Discord and hit the "X" button besides the resume button and that should close it.

If discord updates, this *might* stop working, in this case you just have to remove the non-steam game and add it again, giving the new "app-version" path on the Steam window where you added Discrod.

NOTE: I understand this doesn't have much to do with OpenSource .. It is what it is, this is my only outlet.


Monday 4 December 2017

Virtual Machine doesn't start, stuck at "PCI2.10 PnP PMM"

Another day another problem, I was setting up a lab environment, after creating a Virtual Machine using Virtual Machine Manager, My machine would get stuck here and never move:
  
SeaBIOSversion 1.9.1-5.el7_3.2) Machine UUID ... iPXE (http://ipxe.org) 00:03.0 C980 PCI2.10 PnP PMM
 
The error seemed to suggest there was something wrong with my NIC card as the Virtual Machine would boot if i disabled Network. I even tried it with a new NIC card but i kept getting stuck here.

Solution:
Turned out that I didn't enable Virtualization in BIOS. Please make sure Virtualization is enabled before creating a Virtual Machine.

I am still wondering how I was able to create a VM without a Network.

Sunday 25 December 2016

How to Install GTK-RecordMyDesktop on RHEL 7 (best screen recording software imo)

If you want to record your screen to make tutorials or something else, GTK-recordmydesktop is capable of doing it. Most of the screen-recording programs that I have come across requires you to record your audio separately, however this software is also capable of recording audio without any extra step. It can also work with JACK audio server.

PART 1 - Install EPL repository for RHEL 7:
  1. Open a terminal
  2. Install epel using the following command: yum -y install epel-release.
  3. Refresh repo by typing the following commad: yum repolist.
PART 2 - Install GTK-RecordMyDesktop:
  1. yum install gtk-recordmydesktop
That's it, it should work right away. If it doesn't, it is possible that you might be missing some codecs as I installed them from nux and epel repos earlier.

Sunday 18 December 2016

How to Install Nvidia Drivers on Redhat/Centos 7 - Step by Step guide

  1. Nvidia needs "Development Tools" installed, if you installed it during RHEL installation, you're good, if you didn't, then execute the following commands:
  2. [root@localhost rpmbuild]# yum groups mark install "Development Tools" [root@localhost rpmbuild]# yum groups mark convert "Development Tools"
    [root@localhost rpmbuild]# yum groupinstall "Development Tools"
     
  3. Install Kernel Devel and Kernel headers
         yum install kernel-devel kernel-headers dkms
  4. Now run the following to get to know your Graphics Card (if you already know you can skip this part)
    lspci -nn | grep VGA
  5. Now download the appropriate driver from NVIDIA Downloads
  6. Open “/etc/modprobe.d/blacklist.conf” and add "blacklist nouveau" to the file (if it doesn't exist then create it)
  7. Create a new initramfs and take a backup of the existing one (this might not be needed as i think NVIDIA installer already does this, do it regardless)
    mv /boot/initramfs-$(uname -r).img /boot/initramfs-$(uname -r).img.bak  
    dracut -v /boot/initramfs-$(uname -r).img $(uname -r)
  8. Reboot your computer and login again
  9. Open a terminal and type:
    init 3
  10. Login as root, navigate to the folder where you have downloaded NVIDIA installer file and do the following:
    chmod 755 (NVIDIA installer filename)
    ./(NVIDIA Installer Filename)
  11. Go through the NVIDIA installer prompts, you can choose to install 32 bit libraries, but do save the X configurations at the end.
Cheers!
Source:
This is a compilation of various articles
http://www.tecmint.com/install-nvidia-drivers-in-linux/
https://access.redhat.com/discussions/1262603

Monday 12 December 2016

How to Install Spotify on Debain GNU/Linux 8 (Jessie)

These instructions are from Spotify's Website:
# 1. Add the Spotify repository signing key to be able to verify downloaded packages
sudo apt-key adv --keyserver hkp://keyserver.ubuntu.com:80 --recv-keys BBEBDCB318AD50EC6865090613B00F1FD2C19886

# 2. Add the Spotify repository
echo deb http://repository.spotify.com stable non-free | sudo tee /etc/apt/sources.list.d/spotify.list

# 3. Update list of available packages
sudo apt-get update

# 4. Install Spotify
sudo apt-get install spotify-client
 
I can confirm that they work exactly as written on Debian Jessie, I know some things aren't required for Debain(sudo),
it's a bigger hassle to remove them instead of just copy/pasting :)
 
Enjoy!
Source:
https://www.spotify.com/ca-en/download/linux/
 

Tuesday 11 March 2014

Replace VI with VIM on Debian 7

Make sure you can access internet before attempting this.
  • Open the terminal
  • apt-get install vim
  • sudo vi /etc/vim/vimrc
Uncomment the "syntax on" line to enable color coding that vim comes with. This will replace vi with vim, if you edit a file with say "vi .bashrc" it should show you color coded text instead of just black and white.

Thursday 20 February 2014

Configuring and Deploying DNS servers (primary, secondary, root and cache on centos 6.5) - Part 3 - Root and Cache

Configuration on Root DNS Server:

The root zone maintains information regarding top-level domains. Root-zone servers for internet top-level domains are already deployed. With this you can create your own internet naming scheme, which is usually done in intranets who have their own top-level domains
  • Install bind packages
    • yum install bind bind-utils bind-chroot bind-libs
  • Edit named.conf
    • vi /etc/named.conf
listen-on port 53 { 192.168.12.4; }; //change this to your ip address
*remove the allow-query line
*optional remove recursion line

 zone "." IN {
        type master;
        file "root.net";
      };


  • Create and edit root.net
    • vi /var/named/root.net
 $TTL 86400
@    IN    SOA    root.msm.net.    admin.root.msm.net. (
            535 ; serial
            3H ; refresh
            15M ; retry
            1W ; expiry
            1D ) ; minimum
@                IN    NS    root.msm.net.
root.msm.net.    999999        IN    A    192.168.12.4 //root servers ip and fqdn
msm.net.            IN    NS    ns.msm.net. //primary server's fqdn and zone name
12.168.192.in-addr.arpa        IN    NS     ns.msm.net. // reverse zone named and fqdn of primary dns server
ns.msm.net.            IN    A    192.168.12.2 //fqdn and ip of primary dns server, you can also add similar entries for secondary dns below


  • Open Firwalls
    • iptables -I INPUT -p tcp --dport 53 -j ACCEPT
    • iptables -I INPUT -p udp --dport 53 -j ACCEPT 
  •  edit resolv.conf
    • vi /etc/resolv.conf
search msm.net
nameserver 192.168.12.4 //resolve to its own ip address just to check if server is functioning


  • Start named daemon
    • service named start
  • Query some records that are stored in primary server's database
    • nslookup
      • cache.msm.net 

 Configuration on Cache DNS server:

when DNS(bind named) is installed, by default it configures the machine as a caching server. All we have to do is change the file-name in named.conf and create a file accordingly to point towards our own root DNS server.

  • Install bind packages
    • yum install bind bind-utils bind-chroot bind-libs 
  •  Edit named.conf
    • vi /etc/named.conf

listen-on port 53 { 192.168.12.5; }; //change this to your ip address
*Remove the allow-query line
*Remove dnssec-lookaside auto;
*DON'T remove the recursion line. Of all the servers, this is the only one that must do recursion

 zone "." IN {
        type hint;
        file "file.ca";
      };


*Remove include "/etc/named.root.key";

  • Create and edit file.ca
    • vi /var/named/file.ca
  .        999999    IN    NS    root.msm.net. \\fqdn of root dns server
root.msm.net.    999999        A    192.168.12.4 \\fqdn and ip address of root dns server


  • Open Firwalls
    • iptables -I INPUT -p tcp --dport 53 -j ACCEPT
    • iptables -I INPUT -p udp --dport 53 -j ACCEPT 
  •  edit resolv.conf
    • vi /etc/resolv.conf
search msm.net
nameserver 192.168.12.5 //resolve to its own ip address


  • Start named daemon
    • service named start
  • Query some records that are stored in primary server's database
    • nslookup
      • cache.msm.net
 If this is successful then change the /etc/resolv.conf in all the DNS servers to point to caching server IP address to reduce the load on Primary/Secondary and distribute it towards cache.

Prefer a Video Walkthrough?


Check this wiki page for more information on what's being done
http://en.wikipedia.org/wiki/Alternative_DNS_root

 That's all folks.
 Enjoy.

How to add "Discord" in Steam's Big Picture Mode

 With the release of Steam deck a lot of people are turning into Steam Deck Big Picture Mode(BPM) to enjoy an exclusive gaming experience, t...